This week's Table Time Tuesday is dedicated to the treats that I make as an annual tradition for the Fourth of July. Each year we are invited to our friend's family lake house for Independence Day ... if we bring the éclairs. The first year we were told to bring whatever we wanted. At the time I was experimenting and thought it would be fun to take homemade éclairs. From that day on, I was told we could only come if we brought them. So, for the last four years my preparations for the Fourth have begun on the Third.
Don't get intimidated .... These are super easy! Just really time consuming, if you make as many as I do. I make a quadruple batch every year, which gives me around 120 éclairs. But, I grew up eating these. My mom used to make these all the time ... only, they were cream puffs. That's the super-duper easy way to make them. I'll explain the difference as we continue through the recipe.
And, now, here's the recipe:
HOMEMADE ECLAIRS
1 cup water
½ cup butter
1 cup flour
4 large eggs
1 small pkg. instant vanilla pudding,
made according to pie filling directions & chilled
Chocolate Frosting
1 oz. unsweetened baking chocolate
1 tsp. butter
1 cup powdered sugar
1 to 2 Tbsp. milk
Heat oven to 400°. Heat water and butter to a rolling boil in a 2½-quart saucepan. Stir in flour; reduce heat to low. Stir vigorously over low heat about one minute or until mixture forms a ball; remove from heat. Beat in eggs, all at once; continue beating until smooth. Shape ¼ cupful of dough into finger that is 4½-inches long and 1½-inches wide, using a spatula onto an ungreased cookie sheet. Bake for 35-40 minutes or until puffed and golden. Fill the éclairs with the premade pudding. Frost with Chocolate Frosting.
Chocolate Frosting
Melt 1 oz. unsweetened baking chocolate and 1 tsp. butter in 1-quart saucepan over low heat, stirring occasionally; remove from heat. Stir in powdered sugar & milk. Beat until smooth and spreadable. Frost éclairs.
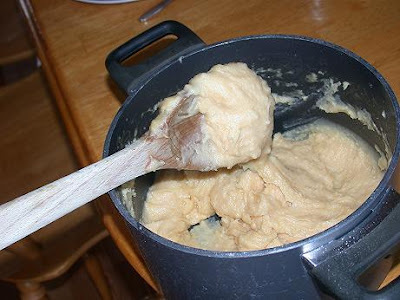
This is what the batter should look like when the eggs are all beaten in. It should kind of sticky. And, it gets harder and harder to stir together. When my Kitchen Aid mixer was working, I used to pour it all into the bowl and let my mixer do the work ... or I'd ask my strong husband to do the stirring when I'd do all four batches at once. This time I split it up into two, and I was still able to stir it okay.

Here's the shaping. Okay, here's where my inventive mind kicked in. The first time I made these, they kind of stuck to the pan. So, I always use parchment paper. There isn't any paper on this pan because I didn't have any ... and it was the only pan that I did this way. Right after I realized I didn't have any parchment paper, I went to the store to get some. That's how important that stuff is. Seriously, go get some, it's heavenly!
The other thing I did differently is scoop the batter into a disposable pastry bag. Then, I twist the top and cut off the point about 1½-inches from the end of the point, then squeeze the batter out in the "finger" formation. Super easy this way, and saves you a ton of time.
**If you want to just make cream puffs, drop the batter onto the cookie sheet, like you would chocolate chip cookies. And, instead of piping in the filling, just slice them in half and plop some pudding on there. Then, put the top back on. They are super messy and yummy this way: exactly the way children like them! I like mixing up the flavors of the pudding too, so that I use chocolate pudding with whipped cream inside.**

After I bake them, I place them on a cooling rack to cool, unless I want to fill them and serve them warm.
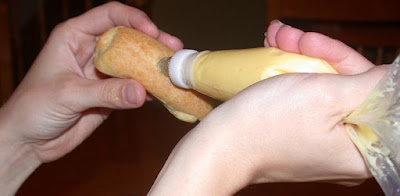
Pull out that chilled pudding, and fill the éclairs with it. Again, I use a pastry bag with a medium-size star tip. I also poke the tip into the top of the éclair because it will get covered with the chocolate frosting. Okay, look how I'm holding the bag. That's exactly how you want to hold the bag. Squeeze your big digit of your thumb against the side of your hand to hold the twisted part of the bad securely. Then, when you squeeze the bag to get the filling out, you'll squeeze your entire fist. This ensures that your hand doesn't get as tired, and all the pudding stays in the bag going the right direction, instead of coming out the open end.

*Tip: Place the filled éclairs in the fridge overnight. That way they are easier to hold on to when you frost them. And, the pudding is thicker so it doesn't spill out.
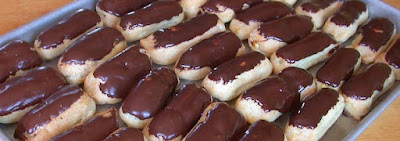
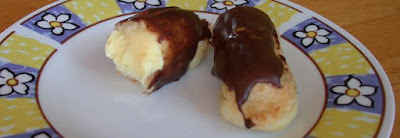
When I make these I always add a little more milk so the frosting is a little thinner and then I can dip the top of the éclairs into the frosting to save time. If you do it this way, just be sure to hold on pretty tight. I think three of mine were sacrificed because I accidentally dropped them in the frosting. (But, my tongue had no complaints about that one!) Here's what they look like finished.

Now, here's another tip. Before you frost those things, scrape off any excess pudding that came out when you filled them the night before. Otherwise, they will look like these little babies; not very aesthetically pleasing.

And, here's a picture of one child being subjected into eating one of these great éclairs to show you how yummy they are. Isn't he cute?
Again, these things are very yummy and make everyone happy. At the lake, I'm known as the "éclair lady;" and everyone asks my friend's mom if I am coming. (Long story, it's coming later.)

Ah, there's a happy éclair-eating-face!
 We eat a lot of pasta in our house. I mean, A LOT! Ever since we used to share dinners with a friend's family, who almost always served pasta, we have enjoyed the best pasta dishes ever! And, this one is just as good as any of the others. The chicken I grilled before I sliced it ... but, I think next time I'll slice it and then marinate and grill it. It was still pretty good as it was. I usually don't add chicken to my alfredo pasta .... but, it just seemed right. And, this is linguini ... one of my favs. I also LOVE penne, farfalle (the little bowties), and rotini. Choose your favorite ... my alfredo sauce is a little think, so you don't have to worry about choosing a pasta that will hold the sauce well. Marinara is different; penne is really good for that one because of the ridges.
  ALFREDO PASTA SAUCE


 BTW, my cookie jar looked like that on Sunday ... and now it's empty. That's how good these are!